This article builds on concepts discussed by Andrew Lock, Jimmy Bogard and Georg Dangl. Here we’re going use Nuke to make build, packaging and publishing even nicer!!!
I’ve been eking out build solutions using various Powershell based tools for years. They serve their purpose, but I always dread getting familiar with the scripts again when I need to make a change. I recently used Nuke on a project and for the first time I feel like I didn’t waste any time fighting with it.
Nuke creates a CSharp Console App within your solution containing a simple Build.cs file that can handle a variety of common build/deployment tasks out of the box. The real joy is that you can now author and debug platform independent build scripts in C# within your favorite IDE!
Let’s jump in.
Using Nuke to Build
- Install Nuke
> dotnet tool install Nuke.GlobalTool --global
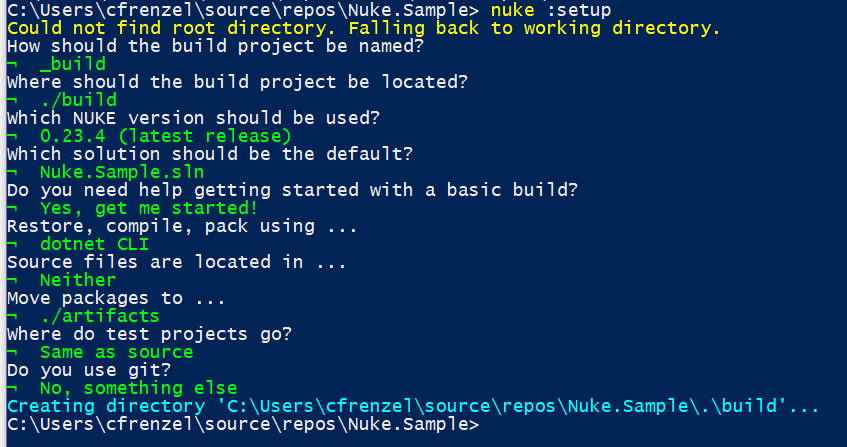
- Add Nuke to your solution - let the wizard get you started
> nuke :setup

TODO:/// Figure out Nuke's logic for framework selection and see if it's configurable
You’ll notice a new project in your solution named _build. Take note of a few files
Build.cs- a fluent “make style” build Class in C#- Defines targets and their dependencies
- Two scripts used to run builds. These scripts will install dotnet if it doesn’t exist and then call your build application. Choose one based on your build environment.
build.ps1- a powershell script used to execute builds (platform independent - must have powershell installed)build.sh- a shell script version (linux/osx/etc..)
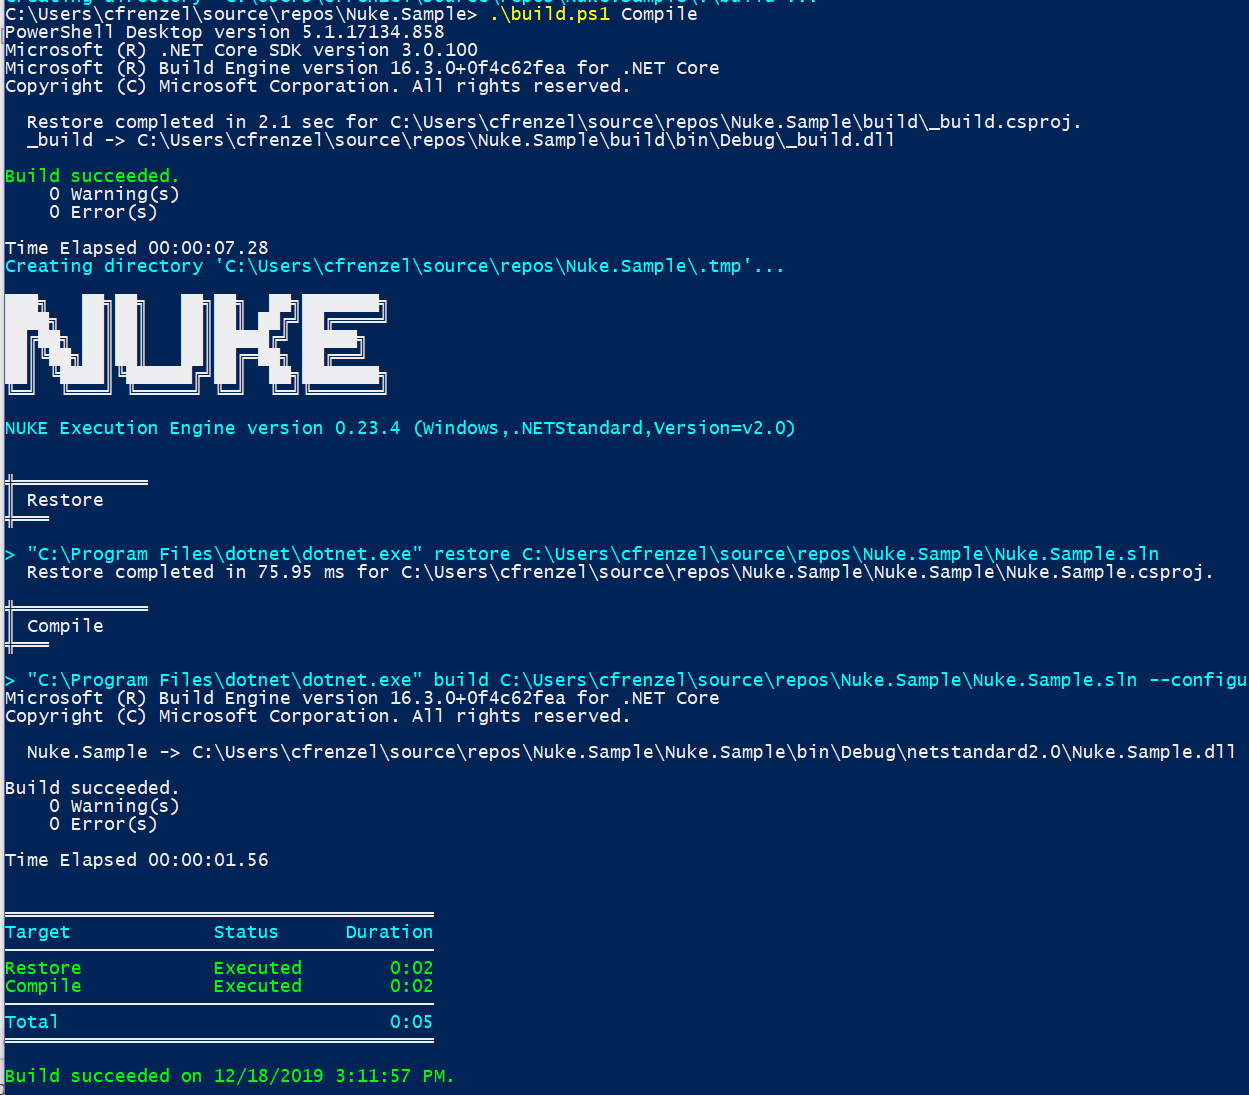
- Now compile your code
> .\build.ps1 Compile

Success! I’ll admit that compiling a project isn’t that impressive, but we’re now scripting in C#. Let’s take it a step further and make a NuGet package.
- Add a Pack step to our build script
Target Pack => _ => _
      .DependsOn(Compile)
      .Executes(() =>
      {
          DotNetPack(s => s
              .SetProject(Solution.GetProject("Nuke.Sample"))
              .SetConfiguration(Configuration)
              .EnableNoBuild()
              .EnableNoRestore()
              .SetDescription("Sample package produced by NUKE")
              .SetPackageTags("nuke demonstration c# library")
              .SetNoDependencies(true)
              .SetOutputDirectory(ArtifactsDirectory / "nuget"));

      });
We want our NuGet package to specify an author, repository, homepage, etc… We could do this programatically from Nuke
 Target Pack => _ => _
      .DependsOn(Compile)
      .Executes(() =>
      {
          DotNetPack(s => s
               ***
              .SetAuthors("Your Name")
              .SetPackageProjectUrl("https://github.com/yourrepo/NukeSample")
               ***
      });
- But it’s simpler to add a
Directory.Build.propsto your solution folder
 <Project>
  <PropertyGroup>
    <Authors>Your Name</Authors>
    <RepositoryUrl>https://github.com/yourrepo/NukeSample</RepositoryUrl>
    <PackageProjectUrl>https://github.com/yourrepo/NukeSample</PackageProjectUrl>
    <PackageLicense>https://github.com/yourrepo/NukeSample/blob/master/LICENSE</PackageLicense>
  </PropertyGroup>
</Project>
- Now call our new Pack target
> .\build.ps1 Pack
Now we’ve got our nuget package: artifacts\nuget\Nuke.Sample.1.0.0.nupkg. If we unzip the .nupkg file we can take a look inside at our Nuke.Sample.nuspec file.
<?xml version="1.0" encoding="utf-8"?>
<package xmlns="http://schemas.microsoft.com/packaging/2012/06/nuspec.xsd">
  <metadata>
    <id>Nuke.Sample</id>
    <version>1.0.0</version>
    <authors>Your Name</authors>
    <owners>Your Name</owners>
    <requireLicenseAcceptance>false</requireLicenseAcceptance>
    <projectUrl>https://github.com/yourrepo/NukeSample</projectUrl>
    <description>Sample package produced by NUKE</description>
    <tags>nuke demonstration c# library</tags>
    <repository url="https://github.com/yourrepo/NukeSample" />
    <dependencies>
      <group targetFramework=".NETStandard2.0" />
    </dependencies>
  </metadata>
</package>
Success! Not bad for a few minutes of our time. Before we move on let’s touch on versioning. If you have an approach that you love, it shouldn’t be hard to work it into our current workflow with Nuke. Here we’ll consider a manual option and using the popular GitVersion tool.
Manual Versioning
- Let’s add add a couple of lines to our
Directory.Build.props.
 <Project>
  <PropertyGroup>
    ---
    <VersionPrefix>0.1.1</VersionPrefix>
    <VersionSuffix>alpha</VersionSuffix>
  </PropertyGroup>
</Project>
- Now let’s call our Pack target again
> .\build.ps1 Pack
Our package name reflects the new version: artifacts\nuget\Nuke.Sample.0.1.1-alpha.nupkg. If we unzip and look inside Nuke.Sample.nuspec we can see the updated version.
<?xml version="1.0" encoding="utf-8"?>
<package xmlns="http://schemas.microsoft.com/packaging/2012/06/nuspec.xsd">
  <metadata>
    <id>Nuke.Sample</id>
    <version>0.1.1-alpha</version>
Versioning with GitVersion tool
Nuke has great integration with the GitVersion tool. You’ll need to read the docs to fully understand how GitVersion determines the current version name for a branch, but to use - simply:
- Add these 2 properties to your
Build.csclass[GitRepository] readonly GitRepository GitRepository; [GitVersion] readonly GitVersion GitVersion; - Add the
.SetVersion(GitVersion.NuGetVersionV2)to your Pack TargetDotNetPack(s => s --- .SetVersion(GitVersion.NuGetVersionV2) .SetNoDependencies(true) .SetOutputDirectory(ArtifactsDirectory / "nuget"));Now GitVersion will work it’s magic to determine the current version name!
Publishing to a NuGet Repository with Nuke
Now that we have our source compiling and our package versioned and waiting in our artifacts folder, lets use Nuke to push it to a repository where it can be used by others.
In order to make this as flexible as possible, we’ll pass the nuget repository’s url and auth_key as parameters to the Nuke build script. Inside the script Nuke makes it easy for us to
- Require that it’s a Release build
- Require that the url and auth_key have been set
-
Get values from commandline / environment using c# fields
- Add 2 Fields to to your Build file with the [Parameter] attribute
    [Parameter] string NugetApiUrl = "https://api.nuget.org/v3/index.json"; //default
    [Parameter] string NugetApiKey;
- Add a Push Target to your Build file
 Target Push => _ => _
       .DependsOn(Pack)
       .Requires(() => NugetApiUrl)
       .Requires(() => NugetApiKey)
       .Requires(() => Configuration.Equals(Configuration.Release))
       .Executes(() =>
       {
           GlobFiles(NugetDirectory, "*.nupkg")
               .NotEmpty()
               .Where(x => !x.EndsWith("symbols.nupkg"))
               .ForEach(x =>
               {
                   DotNetNuGetPush(s => s
                       .SetTargetPath(x)
                       .SetSource(NugetApiUrl)
                       .SetApiKey(NugetApiKey)
                   );
               });
       });
- Push to a NuGet repository
> ./build.ps1 Push --NugetApiUrl "https://api.nuget.org/v3/index.json" --NugetApiKey "yoursecretkey"
Using AppVeyor for Continuous Integration and Deployment
AppVeyor is a CI/CD tool with good support for windows/dotnet (and linux). For open source projects you can setup a free account to build and deploy every time you publish changes to source control. Here we’re going to use GitHub, but you could configure something similar with Azure DevOps
We’re going to build a popular workflow as described by Andrew Lock and Jimmy Bogard. It uses two seperate nuget repositories to publish under different conditions:
- Build all commits on
masterbranch and publish to MyGet.org- Useful for reviewing and testing packages before releasing to the world
- Nightly/experimental builds
- If a commit is tagged we want to build and publish to NuGet.org
- Allows us to use git tags to control versioning and our intent to publish to the world
- Build-only for pull request
- We don’t want to publish a nuget package on pull requests, but we will confirm that the pull request builds
We can accomplish all of this with a simple appveyor.yml file.
- Add
appveyor.ymlto our root folder
version: '{build}'
image: Ubuntu
environment:
MyGetApiKey:
    secure: 56nW3KcP4naYX9mlsVEIKLj5xPdfmpt6lMALR6wQmorRQOaoUOtlwMZ2V0BtGTAM
NugetApiKey:
    secure: /54XAunyBETRa1Fp/qSrwvebSnTAcHDO2OVZ+exMtQtOtrBzHKvp4RC1AB8RD2PQ
pull_requests:
do_not_increment_build_number: true
branches:
only:
- master
nuget:
disable_publish_on_pr: true
build_script:
- ps: ./build.ps1
test: off
deploy_script:
- ps: ./build.ps1 Pack
- ps: ./build.ps1 Push --NugetApiUrl "https://www.myget.org/F/cfrenzel-ci/api/v2/package" --NugetApiKey $env:MyGetApiKey
- ps: |
    if ($env:APPVEYOR_REPO_TAG  -eq "true"){
        ./build.ps1 Push --NugetApiUrl "https://api.nuget.org/v3/index.json" --NugetApiKey $env:NugetApiKey
    }
There are a couple of important bits here
build_script:
    - ps: ./build.ps1
This tells appveyor to call our Nuke build script during the build phase
 deploy_script:
    - ps: ./build.ps1 Pack
    - ps: ./build.ps1 Push --NugetApiUrl "https://www.myget.org/F/cfrenzel-ci/api/v2/package" --NugetApiKey $env:MyGetApiKey
    - ps: |
        if ($env:APPVEYOR_REPO_TAG  -eq "true"){
            ./build.ps1 Push --NugetApiUrl "https://api.nuget.org/v3/index.json" --NugetApiKey $env:NugetApiKey
        }
This tells appveyor to run a series of powershell commands during the Deploy phase.
- We call Pack to create the nuget package.
- Then we Push it to MyGet.org using secure environment variables that we declared earlier
- Then we check an appveyor environement variable
APPVEYOR_REPO_TAGto see if the branch has a tag - If it does we Push to NuGet.Org
For a full working example with multiple nuget packages in a single solution checkout out my repo:
https://github.com/cfrenzel/Eventfully/blob/master/build/Build.cs https://github.com/cfrenzel/Eventfully/blob/master/appveyor.yml https://github.com/cfrenzel/Eventfully
